


- Dental Exams and Cleanings
- Preventative Care
- Sealants
- Fluoride
- Silver Diamine Fluoride
- Fillings
- Stainless Steel Crowns
- Pulpotomy (Pulp Therapy)
- Extractions
- Space Maintenance
*** The information on this page is to help parents understand procedures. We ask that you not review each step signficantly with your child, as we will explain the procedure in a more "kid-friendly" way at the start of their appointment. Often, parents will use different terminology or over-explain, leading to a more stressful appointment for their child.***
Dental Exams and Cleanings
Preventing Problems Before They Start
The health of your child’s teeth and mouth is very important to the well-being of his or her entire body, and while routine brushing and flossing at home is necessary to keep your child’s smile looking its best, visiting the dentist for a comprehensive exam and cleaning is essential. The American Dental Association recommends that your child visit the dentist every six months to ensure his or her teeth stay healthy and smile stays beautiful.
By routinely seeing the dentist for exams and cleanings, your child can:
- Prevent tooth decay, gum disease, and bad breath
- Avoid costly and extensive dental procedures
- Have white teeth by reducing staining from food and drinks
- Shorten the time spent in the dentist’s office
- Have a smile that will last a lifetime
The Exam
During your child’s exam, the dentist will thoroughly examine your child’s teeth and gums for signs of tooth decay, gum disease, and other health problems. The dentist may also want to take X-rays to see what is happening beneath the surface of the teeth and gums. These images will help the dentist discover dental issues not visible to the naked eye.
Professional Cleanings
Once children become cooperative, the hygienist will carefully clean your child’s teeth with a variety of tools to remove any hard mineral buildup (tartar) from the teeth. Then, the hygienist will floss your child’s teeth, use a polishing compound, and apply fluoride. Cleanings usually aren’t painful, but if your child has any anxiety about the dental exam, be sure to let the hygienist know. If the dentist or hygienist finds tooth decay or gum disease, they will talk to you about changing your child’s brushing or flossing habits. If your child’s teeth and gums appear to be healthy, the dentist will probably recommend that your child continue his or her brushing and flossing routine as usual.
Preventive Care
Preventive dental care is important throughout life, especially at a young age. By practicing good oral hygiene at home and scheduling regular checkups with the dentist, your child can help keep their smile bright and healthy for many years to come. Here are a few simple ways to prevent the build-up of plaque and cavities:
- Make sure your child brushes their teeth at least twice a day with a soft-bristled toothbrush. Use fluoride toothpaste to remove food particles and plaque from the tooth surfaces. Also be sure your child brushes the top surface of the tongue; this will remove any extra plaque-causing food particles and help keep their breath fresh!
- Make sure your child cleans between teeth by flossing at least once a day. For children who can spit well, you can also use a mouthwash to help kill bacteria and freshen breath. Decay-causing bacteria can linger between teeth where toothbrush bristles can't reach. Floss and mouthwash will help remove plaque and food particles from between the teeth and under the gum line.
- Make sure your child eats a balanced diet, and try to avoid extra-sugary treats. Nutritious foods such as raw vegetables, cheese, or fruit can help keep your child's smile healthy.
- Remember to schedule regular checkups with your child’s dentist every six months for a professional teeth cleaning.
- Ask your dentist about dental sealants, a protective plastic coating that can be applied to the chewing surfaces of the back teeth where decay often starts.
- If your child plays sports, be sure to ask your dentist about special mouthguards designed to protect your child’s smile.
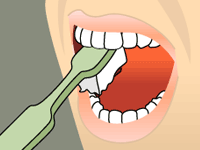
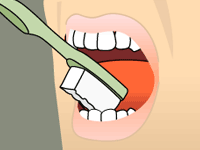
- Brushing Instructions
-
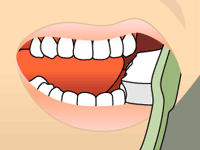
Brushing: Step 1
Place your toothbrush at a 45-degree angle to your gum.
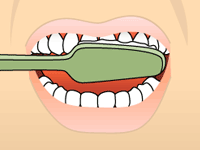
Brushing: Step 2
Brush gently in a circular motion.
Brushing: Step 3
Brush the outer, inner, and chewing surfaces of each tooth.
Brushing: Step 4
Use the tip of your brush for the inner surface of your front teeth.
- Flossing Instructions
-
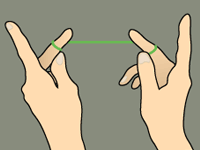
Flossing: Step 1
Wind about 18 inches of floss around your fingers as shown. Most of it should be wrapped around one finger, and the other finger takes it up as the floss is used.
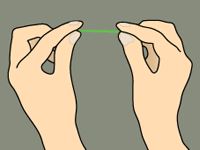
Flossing: Step 2
Use your thumbs and forefingers to guide about one inch of floss between your teeth.
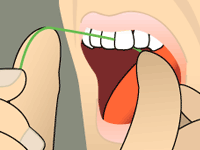
Flossing: Step 3
Holding the floss tightly, gently saw it between your teeth. Then curve the floss into a C-shape against one tooth and gently slide it beneath your gums.

Flossing: Step 4
Slide the floss up and down, repeating for each tooth.
If it’s been six months or more since your child’s last dental checkup, then it’s time to contact our practice and schedule an appointment!
Sealants
Sometimes brushing is not enough, especially when it comes to those hard-to-reach spots in your child’s mouth. It is difficult for a toothbrush to reach between the small cracks and grooves on teeth. If left alone, those tiny areas can develop tooth decay. Sealants give your child’s teeth extra protection against decay and help prevent cavities.
Dental sealants are plastic resins that bond and harden in the deep grooves on the tooth’s surface. When a tooth is sealed, the tiny grooves become smooth, and are less likely to harbor plaque. With sealants, brushing becomes easier and more effective against tooth decay.


Sealants are typically applied to children’s teeth after their permanent teeth have erupted as a preventive measure against tooth decay. It is more common to seal “permanent” teeth rather than “baby” teeth, but every patient has unique needs, and the dentist will recommend sealants on a case-by-case basis.
Sealants last from three to five years, although it is fairly common to see adults with sealants still intact from childhood. A dental sealant only provides protection when it is fully intact so if your child’s sealants come off, let the dentist know, and schedule an appointment for your child’s teeth to be re-sealed.
Fluoride
Your child brushes twice a day, flosses regularly, and visits the dentist every six months. But did you know that rinsing with fluoride – a mineral that helps prevent cavities and tooth decay – also helps keep teeth healthy and strong?
Fluoride is effective in preventing cavities and tooth decay by coating teeth and preventing plaque from building up and hardening on the tooth’s surface.
Fluoride comes in two varieties, systemic and topical:
- Systemic fluoride is ingested, usually through a public water supply or as a fluoride supplement. While teeth are forming under the gums, the fluoride strengthens tooth enamel, making it stronger and more resistant to cavities.
- Fluoride can also be applied topically to help prevent caries (cavities) on teeth present in the mouth. It is delivered through toothpaste, mouthwash, and professional fluoride applications. Professional application of topical fluoride foam and varnishes is also a valuable tool in cavity prevention.
Receiving a fluoride treatment from your dentist
A fluoride treatment in the dentist’s office takes just a minute. After the treatment, patients are asked to not eat anything crunch or scoliding hot for 2 hours in order to allow the teeth to absorb the fluoride. Depending on your child’s oral health or your doctor’s recommendation, your child may be required to have a fluoride treatment every three, six, or 12 months. Your doctor may also prescribe at-home fluoride products such as mouthwash, gels, or antibacterial rinses.
How to choose the right fluoride treatment
When choosing an at-home fluoride product (such as toothpaste or mouthwash), always check for the American Dental Association’s (ADA) seal of acceptance. Products marked with the ADA seal of approval have been carefully examined and approved by the ADA based on safety and effectiveness.
Silver Diamine Fluoride
Silver Diamine Fluoride (SDF) is an FDA-approved topical solution that treats and prevents dental caries and reduces tooth sensitivity. It is made with two acting ingredients: the silver component is an anti-microbial agent that kills bacteria and prevents the formation of new biofilm, and the fluoride prevents further demineralization (softening) of the tooth structure.
Treatment with SDF does not eliminate the need for restorative dentistry (fillings, crowns, etc.) to repair function or aesthetics, but is effective at preventing further decay and may delcay the progression of existing cavities depending on their size.
SDF is a simple and noninvasive way to treat carious lesions (cavities), and it can be done from the comfort of our dental office.
- The carious teeth are isolated, kept dry, and all excess debris is removed.
- A microbrush is dipped in a drop of SDF and placed on the lesion(s) for 1 minute.
- Any decayed areas will stain black. Healthy tooth structure will not stain.
- Excess SDF is removed and patients are instructed to not eat or drink for one hour.
- Fluoride varnish is applied over the SDF.
Why use SDF?
We recommend using SDF in several situations, including:
- Children who have extreme decay (severe early childhood caries)
- Young children who have difficulty sitting still for treatment
- Special needs patients
- Children with carious lesions (cavities) that need to be treated over several visits
The Advantages of SDF:
- Provides immediate relief from tooth hypersensitivity
- Kills the organisms that cause cavities
- Hardens softened dentin making it more acid- and abrasion-resistant
- Does not stain healthy dentin or enamel
The Disdvantages of SDF:
- The areas treated will be very black which can be an aesthetic issue for front teeth
- It is often not definitive treatment so further treatment of these teeth may be necessary, and the dark staining is still very apparent even after a white filling is completed
- SDF is not very affective for large cavities that are near the nerve, nor is it as effective for large cavities between the teeth.
Fillings
In our office, all of our fillings are white composite fillings. Newer dental fillings include ceramic and plastic compounds that mimic the appearance of natural teeth. These compounds, often called composite resins, are usually used on the front teeth where a natural appearance is important, as well as on the back teeth depending on the location and extent of the tooth decay.
What’s right for your child?
Several factors influence the performance, durability, longevity and expense of dental restorations, including:
- The components used in the filling material
- The amount of tooth structure remaining
- Where and how the filling is placed
- The chewing load that the tooth will have to bear
Before your child’s treatment begins, your doctor will discuss all options and help you choose the best filling for your child’s particular case.
- Direct fillings are fillings placed immediately into a prepared cavity in a single visit. They include glass ionomers, resin ionomers, and composite (resin) fillings. The dentist prepares the tooth, places the filling and adjusts it in just one appointment.
Stainless Steel Crowns
As a parent, you do all you can to make sure your child grows up with the best oral health and the happiest possible smile. Even with good home hygiene, decay and traumatic injuries can happen and affect the integrity of a primary tooth. We try to keep your child’s primary teeth intact whenever possible until the permanent teeth erupt, which is when restoring your child’s tooth with a pediatric dental crowns become a good option.
Crowns are a restorative procedure used to improve a tooth’s shape or to strengthen a tooth. Crowns are most often used if your child has a tooth that is broken, worn, or damaged by tooth decay, and too damaged to hold a filling.
A crown is a “cap” cemented onto an existing tooth that usually covers the portion of the tooth above the gum line. In effect, the crown becomes the tooth’s new outer surface. For children, stainless steel crowns are the standard of care for molars.
Why does my child need a pediatric crown when their teeth will fall out?
Your child's back teeth play a very important role in helping them chew their food. Most importantly, these back teeth help maintain space in the mouth for their permanent teeth. If a back tooth is lost early, in certain situations the surround teeth can shift and block the space where the permanent tooth was supposed to erupt. This can result in impaction of teeth and potential need for orthodontic intervention in the future. We try to place space maintainers to hold space when teeth in the back are lost early, but this is not ideal in certain situations. Having a natural tooth hold the space is always ideal!
Stainless steel dental crowns are considered a good temporary restoration to save a primary tooth until the permanent tooth can erupt and take its place. Keeping the primary tooth if at all possible is very important. The conventional placement of a stainless steel crown of a primary tooth is completed in one appointment after numbing, removing the decay, and shaving the tooth down for the ideal fit of the crown.
Hall Crowns - Dr. Cooper only
Norna Hall (for whom the crowns are named after) introduced Hall Crowns as treatment for cavities in baby teeth in the United Kingdom. The stainless steel hall crowns are a minimally invasive option for some cavities in baby teeth. The placement of Hall Crowns does not require any needles, numbing or anesthesia, or drilling. This can make treatment easier for some children, and may lessen the need for sedation and general anesthetics in pediatric dentistry.
Can my child get a Hall Crown?
Most children can benefit from the placement of a Hall Crown when the cavity is not too large. Finding a cavity before it causes significant infection makes it easier to treat with minimally invasive techniques. Some children are not be candidates for Hall Crowns; this could be due to the size of the cavity, death of the tooth (necrosis), symptoms (i.e., pain causing a child to wake at night), or poor cooperation increasing the risk of serious emergencies (choking or aspiration of the crown).
How are Hall Crowns Placed?
When there is inadequate space between the teeth, Dr. Cooper must place elastic spacers first, and then have your child back to cement the crown. This typically makes the placement of the crown more comfortable, but requires an additional appointment. Spacers also make it easier for Dr. Cooper to find a crown that fits better because spacers remove areas a crown can get caught on during the fitting process.
When the crown is placed, pressure will be felt on the adjacent tooth, and it will open the child’s bite slightly. The discomfort from the crown will go away within days, and your child’s bite will return to normal in week.
Do Hall Crowns Work?
Bacteria cause cavities; the bacteria in our mouth breaks down the sugars and starches one eats to produce acid. The acid wears away healthy tooth structure and causes a cavity. When a cavity is sealed within a tooth the bacteria that cause it lose their potential to grow as long as the seal is maintained. The Hall Technique is one method of achieving that seal for baby teeth. Hall Crowns require careful and appropriate case selection and long term monitoring.
The Hall Technique is quick and non-invasive. A crown is seated over the tooth with no cavity removal or tooth preparation. The use of local anesthesia is not required. The technique may reduce the need for advanced behavior techniques such as sedation or general anesthesia. The Hall technique is not an option for children who have extensive decay on many of their back molars.
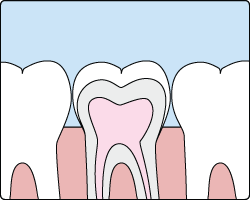
Pulpotomy (Pulp Therapy)
If your child’s primary tooth has extensive decay, or has been damaged by trauma, action may be needed to restore the integrity of the tooth and prevent infection from spreading to surrounding teeth. After a set of X-rays are taken, your dentist will be able to assess the extent of the infection.
Pulpotomy
If the decay or trauma is confined to the crown of the tooth, a pulpotomy may be recommended. When a cavity gets really deep, into the pulp, the pulpal tissue becomes irritated and inflamed. A pulpotomy is when the inflamed pulp chamber, usually on a baby molar, is removed. The dentist will remove all the infected material in the pulp of the crown only, leaving the living tooth root intact. After a pulpotomy on a baby molar, the empty space will be filled with dental cement and a stainless steel crown will be placed to restore the tooth.
Extractions
There are times when it is necessary to remove a tooth. Sometimes, a baby tooth has misshapen or long roots that prevent it from falling out as it should, and the tooth must be removed to make way for the permanent tooth to erupt. Other times, a tooth may have so much decay that it puts the surrounding teeth and jaw at risk. Infection, orthodontic correction, dental trauma, or problems with a wisdom tooth can also require removal of a tooth.
If it is determined that your child’s tooth needs to be removed, your pediatric dentist may extract the tooth during a regular checkup or may schedule another visit for this procedure. The root of each tooth is encased within the jawbone in a “tooth socket,” and the tooth is held in that socket by a ligament. In order to extract a tooth, the dentist must expand the socket and separate the tooth from the ligament holding it in place. While this procedure is typically very quick, it is important to share with your dentist any concerns or preferences for nitrous oxide (laughing gas); we want to make sure your child is as comfortable as possible.
The day after your child’s extraction:
- No drinking with straws
- No vigorous rinsing and spitting
- A soft diet is recommended; no eating of popcorn, pretzels, pizza, crackers, or any food with sharp edges
- If your child has any discomfort, give a children’s dose of ibuprofen (motrin) or acetaminophen (tylenol)
- If your child experiences swelling, apply a cold cloth or an ice bag and call our office
Space Maintenance
If your child’s tooth has come out too soon because of decay or an accident, it is important to maintain the space to prevent future space loss and dental problems when permanent teeth begin to come in. Without the use of a space maintainer, the teeth that surround the open space can shift, impeding the permanent tooth’s eruption. When that happens, the need for orthodontic treatment may become greater.
Types of Space Maintainers
The space maintainers we use are made of stainless steel and are fixed (cemented to the teeth).
Fixed space maintainers come in many designs.

Band & Loop (B&L)
A band-and-loop maintainer is made of stainless steel wire and held in place by a crown or band on the tooth adjacent to the empty space. The wire is attached to the crown or loop and rests against the side of the tooth on the other end of the space. A Band & Loop is routinely used to hold space for a missing primary (baby) posterior (back) tooth until the permanent tooth can grown in. A band and loop can only be used if one tooth is missing in a quadrant. Often, if the band is on a baby tooth, we can remove the band and loop once the 6 year molars are fully in.
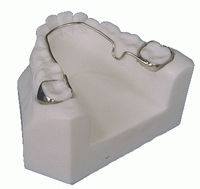
Lower Lingual Holding Arch (LLA)
A lingual arch is used on the lower teeth when the back teeth on both sides of the jaw are lost. A wire is placed on the lingual (tongue) side of the arch and is attached to the tooth in front of the open space on both sides. This prevents the front teeth from shifting backwards into the gap. It keeps the molars from migrating forward and prevents them from blocking off the space of teeth that develop later. This is used when you have the early loss of baby teeth or when you have lower teeth that are slightly crowded in a growing child and you do not want to remove any permanent teeth to correct the crowding.
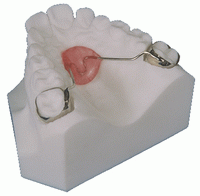
Nance
This appliance maintains the position of the maxillary molars without using any other teeth. The plastic button on the palate provides stability.
In the case of a lost second primary molar prior to the eruption of the first permanent molar, a distal shoe may be recommended. Because the first permanent molar has not come in yet, there is no tooth to hold a band-and-loop space maintainer in place. A distal shoe appliance has a metal wire that is inserted slightly under the gum and will prevent the space from closing.
Caring for Your Child’s Space Maintainer
There are four general rules for taking care of your child’s appliance.
- Your child should avoid sticky foods, including candy and chewing gum.
- Encourage your child not to push or tug on the space maintainer with the fingers or tongue.
- Keep your child’s space maintainer clean through effective brushing and flossing.
- Your child should continue to see the pediatric dentist for regular dental visits.


